Sunday, September 30, 2012

Apricot-Glazed Chicken Breasts

Hello loyal follower(s)

     Last night we had a dinner guest, Ann Olson, who has not been to our home since 2010.  I was given the honor of making the main course.  We also had Broccoli Salad which definitely the best recipe ever.  It was the recipe I wrote about in the September 20, 2012 blog.  Simple boiled red potatoes rounded out the meal with wine of course.
     For the glazed chicken breasts I started with the recipe from Cook's Country magazine June/July 2012 issue.  But of course I just had to make changes to the recipe. First of all it called for a large skillet and a large baking dish.  I chose to use just a large oven proof skillet.  the word FOND ("browned bits of chicken that stuck to the skillet" ) seems to be a favorite word for the writers at Cook's Illustrated and Cook's Country.  It was not in my 1985 Webster's dictionary.
      I also added the brining process and flatten out the breasts to a more uniform thickness.  The cooking times where modified to fit the changes I made.

The results were beyond my dreams, in spite of a few goofs.


Here the sauce was pre-made, the the chicken has been flatten out and brined and everything is just waiting for the time to start cooking.


You will notice that there were only two breasts in the skillet. I had to batch the cooking.  However, I forgot to add two teaspoons of oil before cooking the second batch of breasts.  The FOND was a little blacker than I desired.  At the time I thought what a mess.  It's going to be a big job to clean up the skillet.


After about 4 -5  minutes the breasts were turned and were then browning on the other side for about two minutes.  I removed the chicken from the skillet and poured the apricot sauce mixture into the skillet and like magic the FOND just melted from the bottom of  the pan.   The acid in the orange and lemon juice was at work.


After the sauce thickened the chicken was add to the sauce in the skillet, and turned to glaze the surface of the meat.


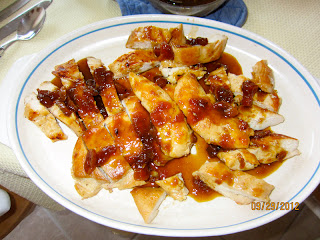
The final results, ready to serve.  By slicing  up the breasts into smaller portions,  people can better judge their desired serving size.


Recipe follows - and it was a winner


À bientôt,

Mr Nut

Apricot-Glazed Chicken Breasts
Modified from an article and recipe from Cook's Country magazine; June/July 2005
Fro blog Sept 30, 2012 revised 11-11-12


      Browning the chicken on the stove in a skillet improved the flavor of the chicken. The fond—browned bits of chicken that stuck to the skillet—added valuable flavor to the sauce. 
Serves  four
The breasts were pounded down to make sure that the chicken cooked evenly,  Check the chicken after about 6 minutes to make sure it isn't browning too quickly.
INGREDIENTS
10 ounces apricot preserves
1/2 cup orange juice
3  tablespoons lemon juice
1/4  cup roughly chopped dried apricots
1/8 teaspoon Sea Salt
1/8 teaspoon coarse ground black pepper
4 boneless  chicken breasts about 38 ounces
2  teaspoons vegetable oil per batch of browning

INSTRUCTIONS
 1  Flatten out the breasts: Place a chicken breast half between 2 pieces of plastic wrap. Using the flat side of a meat mallet, pound meat (smooth side down) lightly, aim for a thickness of  about 1/2 inch thick. Work from the center outward.  Remove plastic wrap. Repeat with remaining chicken.
2. Brine the chicken for 30 minutes in about one quart of water with 1/4 cup salt dissolved in the water.
3. Adjust the oven rack to the middle position and preheat the oven to 425℉.
4.  Whisk the Blue ingredients together in medium bowl. 
5.  Heat two teaspoons canola oil (for each batch) in large oven proof skillet over medium-high heat until just smoking 
6.  Place chicken breasts, smooth side down, in skillet, and cook until well browned  4 to 5 minutes. Turn chicken and lightly brown on second side, 2  minutes longer. 
7.  Remove the  chicken and set aside. In the skillet add apricot mixture. Simmer vigorously over high heat, stirring constantly, until thick and syrupy, 3 to 4 minutes. Scrape all the Fond from the sides of the skillet into the sauce.  
8.  Return the chicken to the oven proof skillet mixing it into the apricot sauce so that all sides are glazed.
9.  Put the oven proof skillet with the chicken and sauce in the oven and bake at 425℉, turning chicken halfway through cooking, until thickest part of breast registers 160 degrees on instant-read thermometer, (12 to 16 minutes not sure of this timing). Transfer chicken to platter and let rest 5 minutes. I found it was a good idea to cut the chicken into smaller pieces before serving.  Meanwhile, transfer glaze remaining in the skillet into a small bowl. Serve chicken, passing extra glaze separately. 

Tuesday, September 25, 2012

Lettuce Saver; Sweet Tooth Quick Fix and Dealing with Yolks

Hello Loyal follower(s)

      Knowing that you are likely to be too busy with your life to be aware of some of the neat ways of solving everyday problems, I will help you out.  The following were sent to me via E-mail or taken from my favorite magazine; Cook's illustrated.

     First from the Oct-Nov issue of Cook's illustrated was  suggestion from Tom Clark from Noblesville Ind.  He suggested creating a carbon dioxide generator to help extend the shelf life of greens such as lettuce. Just exhaling into a bag of lettuce was not sanitary. The people at Cook's Illustrated followed through and developed a neat CO2 generator.

This was all that was necessary to create a CO2 generator for extending refrigerator life of greens.

At the left is a cut down plastic container that would hold about three ounces which was to become the CO2 generator.
Three pieces of paper towel and a rubber band to top off the generator, yet allow the gas to escape into the plastic bag containing the greens.

Baking soda acted as the trigger.

Finally the White Vinegar. I know that it seems to be a rather large bottle of vinegar just for cooking, but I also use it to clean filters for our dehumidifier.

CO2 Generator:   First freeze 1 teaspoon of vinegar in the bottom of the 2-3 ounce container.  Then sprinkle 1 teaspoon baking soda over the frozen surface of the vinegar. Lastly seal the top with the three layers of paper towel and a rubber band.  Store in the freezer until you need it.


OK! It's time to put the CO2 generator to work.

Take it out of the freezer and slip it into the bag of greens and seal the bag. As the vinegar melts it will interact with the baking soda; Voilà ! CO2.

That is why I like Cook's Illustrated, I get many great ideas from their articles.


NOW ABOUT THAT DESIRE FOR SOMETHING SWEET WHILE WATCHING TV.  Here is something you can make during one of the commercial breaks.  This recipe is actually on the Duncan Hines web site!

This was sent to me by my dear friend in Minnesota; Joanne Knabe.  This is perfect for those of us with just one or two in the house these days & hate to make a huge cake (cause I tend to eat it all). This way you can make 1,2,3, or as many as you need.
She says, "trust me it is great for a little treat.  I tried the angel food and spice cake and added a some raisins and chopped walnuts in each cup before microwaving and put some carmel sauce on top when it was hot and let it melt and cool and it is heavenly!"  What more can I say.

3, 2, 1 CAKE

These individual little cakes are amazing and ready to eat in one minute!
They are perfect for whenever you feel like a treat without all the fat and
calories that cake can have. Genius idea!

INGREDIENTS:

1 box Angel Food Cake Mix

1 box Cake Mix - Any Flavor

Makes 1 serving.

DIRECTIONS: In a zip-loc bag, combine the two cake mixes together and mix
well. For each individual cake serving, take out 3 Tablespoons of the cake
mix combination and mix it with 2 Tablespoons of water in a small
microwave-safe container. Microwave on high for 1 minute, and you have your
own instant individual little cake!

KEEP remaining cake mixture stored in the zip-loc bag and use whenever you
feel like a treat! You can top each cake with a dollop of fat free whipped
topping and/or some fresh fruit.

Helpful Tips:

This recipe is called 3, 2, 1 Cake because all you need to remember is:

"3 tablespoons mix,

2 tablespoons water,

1 minute in the microwave!"

TRY various flavors of cake mix like carrot, red velvet, pineapple, lemon,
orange, etc. Just remember that one of the mixes has to be the angel food
mix; the other is your choice. The flavor possibilities are endless!

NOTES:

The best thing is, you open both cake mixes into a gallon storage bag,
one that 'zip locks' or 'self-seals', or a container that seals
tightly, shake the two cake mixes to blend and then make the recipe.
Storage of mix is simple, put it on a shelf. No need to refrigerate,
since the mix is dry.  Always remember, that one of the cake mixes
MUST be Angel Food. The other can be any flavor. The Angel Food is the
cake mix that has the eggs whites in it.

OK! The grand finality is the neat way to separate egg whites from yolks.  This
was also sent to be from Joanne Knable and will be the way I will separate whites from yolks;  First crack the egg on the counter and place the egg (minus the shell) on a plate.  Second take an empty water bottle ( the flimsy type) and while compressing the plastic bottle a little bring the mouth of bottle carefully in contact with the yolk.  Release the compression on the bottle and presto the yolk will be in the neck of the bottle. Yea! really.
Watch here > http://bbs.wenxuecity.com/cooking/1160651.html


Before I close for the day here is a photo of the quilt that Cyndy is making for me for cool nights in front of the TV.


That's it for today,

À bientôt, 

Mr Nut   


Sunday, September 23, 2012

Basic Artisan No-Knead and No-Reflate Bread


Hello loyal follower(s)

     It is Sunday, time to finish making bread and listening to the Prairie Home Companion on radio along with working a Sudoku puzzle and reading Cook’s Country Magazine.  My version of multitasking.   In reality I’m not good at it, this is my third try at the same Sudoku puzzle.  And I present to you now from the reading a little knowledge.
     I bet you do not know the background of a common product that we all use when cooking, it is CANOLA  oil.  The following came from (paraphrased) from a short article in the Oct-Nov issue of my favorite magazine;  Cook’s Country Magazine.   Kleenex, it used to be a trademark name for a brand of  facial tissue.  Now it s generic for facial tissue.  Likewise for   CANOLA, originally it was a trademark  for CANada Oil Low Acid, today it just low acid cooking oil made from rapeseed that has been genetic altered to have a neutral taste. 

Again from my favorite magazine (Aug-Sept) I found a neat recipe for Slow Cooker Beer Brats.  i want to make this in the worse way BUT, Cyndy does not like Brats or Sauerkraut.   Somehow sometime I will make that recipe even if I have to eat all the Brats myself.  By now you realize that I recommend Cook's Country magazine as fun ready if you cook at all.  Each issue has six 30 minute meal recipes on "postcards" in the center of the magazine.

And now for the main part of this blog:  Revamp of the Basic no-knead bread from the blog of October 14 2011. After rereading the book by Jim Lahey, I finally realized that he did not deflate  the dough when making bread.  What I did was eliminate the deflating of the dough and adjusted the baking times.


 After the 18 hours of fermentation, the dough was divided into two pieces. i was concerned that the cutting of the dough would negatively affect the rounds, but it was not a problem.


The loaves had just completed 30 of baking and were now moved to aluminum foil to continue bakings.


The tops were now to my desired degree of brownness.


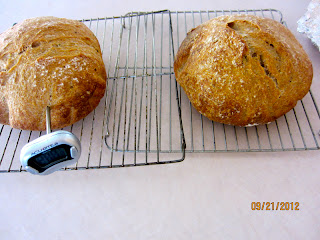
the bread is now done, having achieved a desired temperature of 201℉.

As you can see I like a very light brown.


This was the final result, notice the various sized air holes.
The crust was crisp and the crumb was tasty.

We made BLTs for lunch with the fresh bread.

Recipe follows:

À bientôt, Mr Nut


 Basic No-Knead No-Deflate Bread
Oct 14, 2011 revamped 9-22-12
European style: (Crisp-crust; large air spaces)
Inspired by The Basic No-Knead Bread from Jim Lahey’s My Bread page 61 
Modified for 7 qt Cuisinart stand mixer.with speeds from 1 to 12
Yield: Two seven inch rounds

  Planning was crucial: Mixing time for the ingredients was minimal, the first fermentation requires from 12 to preferably 18 hours. Then the dough was divided into two pieces and “shaped” into rounds and fermented for about another 1 to 2 hours. The longer rise tended to result in a more flavorful bread.  Even a 12 hour rise was acceptable. 

Ingredients: 
7 cups (35 ounces; 980 g ) Bread flour 
1 tablespoon Sea salt
1/2 teaspoon instant dry yeast
1/4 cup Dough Enhancer   
About 2  2/3  cups water 
  
1.In the stand mixer bowl, using the Chef Whisk on speed one, mix the Blue  ingredients.
2. Change to the Flat Paddle at speed 2 and slowly add the Red Ingredient and mix just until you have a  workable dough.   
3. The first Fermentation: (12 to 18 hours)  Move the dough to an oiled bowl (so yo can clean up the stand mixer).  Cover the bowl to prevent evaporation and let it sit at room temperature (about 72-75℉ a heating pad helps), out of direct sunlight, until the surface is dotted with bubbles and the dough is more than doubled in size. This will take a minimum of 12 hours and preferably up to 18 hours. This slow fermentation makes a more flavorful bread. NOTES: Long low temperature (low 70s℉) fermentation allows both the yeast and bacteria to feed on the sugars in the dough, which enhances the flavor.
 4. Remove the dough to a floured work surface and divide it into two pieces. Form rounds  without deflating the dough. 

  5. Second Fermentation: Set out two 15-inch squares of baking parchment paper. Generously dust them with flour. Place each round into the center of the parchment papers. Generously dust the rounds with more  flour.   Tent the dough with larger bowls. Let them ferment for 1 1/2 to 2 hours. 
6.  Prepare Oven: 20 minutes before baking time, put a rack in the middle of the oven with the Dutch ovens; preheat the oven to 450°F. If you have a pizza stone place it near the bottom of the oven it will act as a heat sink.
7. Final Dough preparation:  Using the parchment paper as a sling, carefully lift the dough into the HOT pots; take care not to touch the hot pot. Immediately top the pots with its lid. 8.  Baking: Bake on the lower rack for 30 minutes. Remove the lid. Using the parchment paper, lift the loaf from the pot and remove the parchment paper. Place a piece of aluminum foil on the oven rack.   Then place the loaves on the aluminum foil (If the top is  browned to your satisfaction, cover the loaves with foil and finish baking.).  Bake for 25 to 35 minutes longer, (watch  the tops for brownness) until a skewer inserted in the thickest part comes out with just a few crumbs on the tip (or until the center registers about 200-205°F on an instant-read thermometer). Then bake for 5 minutes longer to ensure the center is baked through. Note: the appearance of the loaves is more important in determining the doneness of the loaves than the internal temperature (from Cook's illustrated magazine, May-June 2011 page 31).  Cool  thoroughly on a wire rack. 
9. SERVING AND STORING: Cool before slicing and storing. The flavor improves after several hours of storage. To maintain the crisp crust, store in a large bowl draped with a clean tea towel or in a heavy paper bag. Or store airtight in a plastic bag or foil: The crust will soften, but can be crisped by heating the loaf, uncovered, in a hot oven for a few minutes. The bread will keep at room temperature for 3 days, and may be frozen, airtight, for up to 2 months.


Saturday, September 22, 2012

33% Whole Wheat Artisan Bread (Revamped)

Hello loyal follower(s),

We have now been back at St George, UT for ten days and have been gradually returning to our normal routines.  Which means it is time to make some bread
My choice was the recipe from May 17, 2011 which was revised July 9, 2011.  One glaring error still remained which called for baking the bread for 50 minutes, which I hope was just a typo.  Anyway, there are changes that need to be made, that reflect what I have learned in the last year and half.
    First of  all, when rereading the book; My Bread by Jim Lahey, it finally came  through that he did very little deflating of the dough, thus leaving many air pockets in the dough which would translate into large irregular bubbles in the bread.
    Secondly, the concept of delayed fermentation is a neat idea but impracticable because it takes hours for the dough to warm up after refrigeration before you start the 18 hour fermentation. I decided to skip that step this time.
    Thirdly making two loaves at a time creates a problem when the dough is  split into two loaves.  I tried to separate the dough immediately after the 18 hour fermentation, and then form round without deflating the dough.

This was one of the loaves ready for a second fermentation without deflating the dough before forming a round.


This was the second loaf, notice the open spot which I think was from some of the air bubbles in the non-deflated dough.


After the almost two hours of the second fermentation, the loaves were placed into the hot Dutch ovens and then placed into the 450℉ oven for thirty minutes.


After thirty minutes the loaves were removed and placed on a piece of aluminum foil and baked  for another 20-25 minutes our until the internal temperature was 200-205℉.  Notice the foil on top of the loaves? It keeps the top from becoming too dark, use your judgement.


Voilà! the finish loaves.  Some people would prefer a darker crust than shown here.  I like the light crust.


Just look at that great crumb.  That was what I was seeking all along for the past two years.

But  by deflating the dough I was removing the bubbles I was seeking.


Why am I making bread again after declaring myself gluten intolerant in July  2012?  Because my intolerance of gluten was greatly exaggerated, I seem to handle gluten OK now.


Revamped recipe follows:

À bientôt, Mr Nut

33% Whole Wheat  Artisan Bread 
Revised Sept 22, 2012
Yield two seven inch rounds each about 1 1/2 pounds

European style: (Crisp-crust; large air spaces)

Inspired by Jim Lahey’s My Bread and
Cook's Illustrated website (Published September 1, 2003 )

Modified for a Cuisinart stand mixer, with speeds from 1 to 12

        Finally, Mr Nut found (in Canada) the perfect sized cast iron Dutch ovens. They are 3.3L

 or 3.48 quarts.  The most important measurement was the inside bottom diameter, which

 was 6.75 inches. The inside top diameter was 8 inches and the depth was 4.5 inches.
       This recipe provides freedom of choice with timing and techniques.  It is possible to start

 this bread anytime of the day and modify or delay the fermentation time to meet your

 schedule
.  
    Bread flour is wheat flour minus the germ the bran leaving only the endosperm. The

 endosperm contains the two proteins needed for making gluten. Vital Wheat Gluten needs

 to be added to help compensate for the smaller amount of gluten-forming proteins in the

whole wheat flour.

     Optionally, delayed fermentation can be used (3 to 10 hours) which  will soften the bran

 in the whole wheat and decreases the tearing of the gluten sheets. 

Long fermentation at room temperature eliminates kneading and allows for the yeast to

 work its magic.
  
The following (optional) natural healthful ingredients are added to improve bread volume or

 taste
Sea Salt, which contains additional minerals for better gluten development.

Dough Enhancer: self explanatory (see blog from April 5, 2011).
Wheat Gluten:It helps improve the rise and texture of the bread.

Fresh Rosemary: A natural antioxidant, acts as a preservative and flavorer.
     

Ingredients:
2 cups whole wheat flour ( 10 ounces, 280g)
1/4 cup vital wheat gluten (1.25 ounces, 35g)
4 cups (20 oz, 560 g) flour bread flour
1 tablespoon Sea Salt
1/4 cup Dough Enhancer
1 teaspoon instant dry yeast
2 teaspoons chopped fresh rosemary
about 2 1/2 cups cool 55-65℉ water (20 fl ounces)

  1. Mixing: In the mixer bowl using the Chef’s Whisk at speed one, mix the blue ingredients.  Change to the Flat Paddle Blade on speed 1 and just enough cool water  to yield a firm but workable dough.  Keep mixing to a minimum. 
  2.  I usually omit this: Delayed fermentation: Move the dough to another bowl.   Spray the top of the dough with oil, and cover the bowl with plastic wrap. Refrigerate  the dough for 3 to 10 hours. Make the time fit your time schedule. Caution:  After the delayed fermentation you may want to place the dough on  a heating pad and allow it to return to room temperature before beginning the fermentation process.
  3. First fermentation is at room temperature (equal or greater than 72℉) for 12 to 18 hours. Again, make the time fit your time schedule, even 12 hours is workable.
  1. Create the two loaves:  Gently remove the dough (in one piece) from the bowl on to a floured working surface. Cut the dough into two pieces and form  rounds. 
  1. Second Fermentation: Set out two 15-inch square of baking parchment paper.   Generously dust them with flour.  Place the rounds into the center of the parchment papers.  Generously dust the rounds with more flour.  Tent the bowl with nonstick spray-coated foil, or a large bowl.  Let it ferment for 1 1/2 to 2 hours.   
  1. Preparing the oven: About thirty minutes before the end of the second fermentation, place the “Dutch oven” type pots in the oven on the rack just below the midpoint of the height of the oven and preheat the oven to 450℉ (takes about 20 minutes).  If you have a pizza stone, place it on the lowest oven rack ( makes a heat sink).  This recipe is based on cast Iron pots with  base diameter of 6.75 inches, which will yield two pound and half loaves. 
  1. Baking: Treat the parchment paper as a sling and carefully lower the dough with the parchment paper under the dough, into the HOT Dutch ovens. Bake on the middle rack for 30 minutes. Remove the Dutch oven lids.  Lift the loaves from the pots using the parchment paper as a sling, and remove the parchment paper and place the loaves on the middle oven shelf on a piece of aluminum foil.  (If the top is well browned, cover it with foil.).  Bake until the crust is a rich chestnut color, and the internal temperature of the loaf is about 200- 205℉. (about 25 to 35 minutes longer).   Note: the appearance of the loaf is more important in determining the doneness of the loaf than the internal temperature (from Cook's illustrated magazine, May-June 2011 page 31).
  1. Remove the loaf from the oven and place them on a rack to cool thoroughly. Don't slice the bread until it has cooled, which usually takes at least an hour. 

Thursday, September 20, 2012

Broccoli Salad


Broccoli Salad

Hello loyal follower(s)

I have never made Broccoli Salad before.  As you know I am a new comer to cooking except for bread making.   Through Cook’s Illustrated and Cook’s Country magazines I have learned  many good methods and used many of their recipes (modified of course).
    Yesterday I was intrigued with a Broccoli Salad recipe developed by Carolynn Purpura Mackay in the August/September issue of Cook’s Country.  What I like about Cook’s magazines is that they explain how and why the choose the ingredients.  They do the trial and error for you which does save time.  In a week from tomorrow I want to make Broccoli Salad along with, maybe Salt-and -Vinegar potatoes and marinated Grilled London Broil for dinner guests.  I’ll try the  Salt-and -Vinegar potatoes early next week to see of they will be included in the menu for our guests.

Back to the Broccoli Salad, I made what was supposed to be a recipe for two but with our appetites it was enough for four.  The result was that Cyndy did not like the vinegar taste and I felt it left an after taste of vinegar even after the meal was finished.  I asked to see Cyndy’s recipe that she uses (from her sister Donna Richter in Florida).  It was almost the same as the recipe I used,  except her’s did not have vinegar and used sugar instead. The broccoli stems were shredded on the food processor which I thought was an improvement over just cutting them into small 1/4 inch “wheels.”  Also sunflower seed were used instead of dealing with walnuts and there was no onion.

By taking the best of both recipes I present to you a great recipe for Broccoli Salad.

Recipe follows:

À bientôt,

Mr Nut

Broccoli Salad
Based upon recipe from Donna Richter
Serves 4 senior citizens

Ingredients:
2 slices bacon chopped fine
1/4 cup raisons ( I like golden raisons)
two broccoli crowns: 2 cups broccoli florets,  cut into about 1/2 inch pieces, stems peeled and shredded (use small hole blade) in the food processor.
1/3 cup mayonnaise
1 teaspoons Natural Cane Turbinado sugar (This is a new to me but Cyndy uses it and has it on hand)
1/2 teaspoon salt
1/4 teaspoon black pepper
2 tablespoons sunflower seeds

Instructions:

  1. Process the broccoli; keep the florets separate from the stems. Put water into the food steamer and heat the water to steam.
  2. In the microwave, heat 1/2 cup water to boil,  in a small glass bowl and then add the 1/4 cup raisin and let then soak for  five minutes.
  3. While the water is heating in the steamer, chop the two bacon strips into small pieces and cook them in the skillet. Set the cooked bacon aside on a paper towel.
  4. When the steamer is ready place the broccoli florets into the steamer for one minute, then lay them out on a clean paper towel to dry.
  5. Shred the broccoli stems in the food processor (use fine blade).
  6. In a large bowl, whisk together the 1/3 cup mayonnaise, 1 teaspoon sugar, 1/2 teaspoon salt and 1/4 teaspoon black pepper.
  7. When dry add the broccoli florets, stems, raisons and sunflower seeds to the bowl with the mayonnaise mixture. Toss to combine  and season to taste.  If the bacon bites have cooled enough crush them into very small pieces and sprinkle on top of the salad.

This salad can me made up to six hours in advance of serving.

Tuesday, September 18, 2012

Spanish Rice with Pork Chops

Spanish Rice with Pork Chops

Hello loyal follower(s)

The misadventures continued (not on purpose) as I attempted to make dinner with a fool proof recipe.   In the  May 7, 2011 I first presented the recipe for Spanish Rice with Gas-Grilled Pork Chops.  Cyndy had been out most  of the day running errands and dinner needed to be made and the above recipe it looked  so easy that nothing could go wrong.  Thus I  decided to do it again.  I actually had all the ingredients and lots of confidence.

Based upon my "vast" experience with brining I cut down on the salt and sugar called for in the original recipe. and modified the directions for grilling the pork chops.


The pork chops had just finished  "browning"two minutes on the down side, and were just starting the two minute browning process on the other side.

Then they were placed just off the heated part of the grill and covered until the internal temperature reached 135℉.


Meanwhile the sauce that was to be poured over the uncooked brown rice was prepared.  The oven was heated to 375℉ ( I forgot to write that information into the original recipe). The sauce was poured over the rice and baked in the oven for 45 minutes,


After baking for 45 minutes this was what it looked like ----NOT GOOD.  Too dry and the rice was not cooked enough.  And that's where the title of this blog comes from.
Rechecking the recipe I found that it called for two cans of tomatoes not just one.

I finished the pork chops, added them to the rice dish, added the second can of tomatoes and baked the mess for fifteen more minutes.


Meanwhile I turned my attention to The vegetable for dinner.  It is hard to screw up steaming carrots, you may cut yourself and if you don't pay attention you could over cook them.

They came out perfect.


The end result - not pretty but not bad tasting

You cannot see it but I added shredded  Cheddar cheese before the second can of tomatoes.  It was suppose go on the top of the finished product, but hey! it was in there somewhere.

Cyndy came home while I was in the middle of this creation and immediately fell asleep in her queens chair (located about 20 ft from my work station).  It didn't phase her, when I almost dropped the whole mess on the floor when I burned my hand through a too thin hot pad.

Anyway we now have an extra meal done for Wednesday evening.

Revised recipe from May 7, 2011 follows:

À bientôt,
Mr Nut


SPANISH RICE WITH GAS-GRILLED PORK CHOPS
Spanish rice based on Better Homes  & garden 75th year edition 2005
Pork chops based on Cook’s  Illustrated website Published May 1, 2002
Serves 4 

Brining the chops to pump up their flavor and lock in their moisture; is the  secret to the juiciest, most flavorful pork chops.    
      
Brining Ingredients:

      1/4 cup  Sea salt or table salt
      1/4 cup granulated sugar
      4 loin pork chops or center-cut loin chops, each 3/4 inches thick

Pork Chop Instructions:
  1. Dissolve 1/4 cup salt and 1/4 cup sugar in about 20 ounces cold water in 1-gallon zipper-lock plastic bag (or a flat glass container). Add chops and seal bag, pressing out as much air as possible. Refrigerate, turning bag once, until fully seasoned, about 30 minutes. Remove chops from brine and dry thoroughly with paper towels. 
  2. Light grill and turn all burners to high; cover and heat grill about 5 minutes. Use wire brush to scrape cooking grate clean then oil the grates. Turn off all but one burner. Place chops over hotter part of grill, cover, and cook until browned on each side, 1 to 2 minutes per side. Move chops to cooler side of grill. Cover and continue cooking, turning once, until instant-read thermometer inserted through side of chop  registers 135 degrees, 1 to 2 minutes longer. Transfer chops to casserole of cooked rice and sauce. . 
Spanish Rice ingredients:
      1/2 cup chopped onion (1 medium)
       I/2 cup chopped green sweet pepper
      1 teaspoon clove minced garlic
      1 tablespoon olive oil
      1 teaspoon chili powder
      2 cans of 14.5 ounces can diced tomatoes, undrained 
      1 cup water
      1/8 teaspoon Sea salt
      1/8 teaspoon black pepper
      Several dashes bottled hot pepper sauce (Tabasco)
     1  cup uncooked brown rice
     1/2 cup shredded Cheddar cheese 

Preheat oven to 375℉
  1. In a large skillet with 1 tablespoon hot olive oil,cook 1/2 cup onions, 1/2 cup sweet pepper, and 1 teaspoon minced garlic tender ( about one minute). Add teaspoon chili powder; cook 30 seconds more. Stir in TWO cans diced tomatoes undrained, hot pepper sauce, 1 cup water, 1/8 teaspoon salt, and 1/8 teaspoon black pepper. Bring to boil. 
  2. In a Casserole about 12 inches square and at least 2 inches deep, place the uncooked rice in the bottom and pour the results of step one over the rice and stir. Cover the casserole and bake  in the preheated oven for 45 minutes.  Embed the grilled pork chops  in the rice sauce mixture and sprinkle with the 1/2 cup shredded Cheddar cheese. Bake for another 15 minutes.