Friday, November 9, 2012

Egg Salad Sandwiches & Hamburger Stroganoff

Hello Loyal follower(s)

       It has been a quiet week  around here, I did some much needed cleaning of OUR kitchen drawers.  It was amazing how dirty drawers can get over time.  They really should remain clean, but there are crumbs etc. that just appear.
       Wednesday, I wanted to make egg salad sandwiches for lunch but did not have a recipe.  Yes, I know there are many recipes for egg salad on the internet, but instead I utilized  Cyndy's memory.  That way there would be limited use of mustard and onions which  meant Cyndy would eat the stuff.


Egg Salad Sandwiches
From Cyndy’s memory
November 2012

Serves two

Ingredients:
1/4 cup finely chopped celery
1 teaspoon finely chopped onion
Dash of pepper
1/16 teaspoon dry mustard
1/8 cup Miracle Whip 
1/8 cup sour cream
2 hard boiled eggs  (diced)

Instructions:  
  1. Mix the blue  ingredients together.
  2. Mix in the red ingredients.
  3. Mix in the eggs. 

Make the sandwiches and enjoy.  Lettuce is a good addition to the sandwiches. 


      The fourth was my birthday and to celebrate we were going to go to a buffet restaurant. Cyndy and I do not eat much and for the price of a buffet we could go to a good restaurant ( one where you did not have to bus the dishes) like Outback.   I still wanted to have a buffet dinner so we went to the grocery store Deli and picked out the items that interested me and purchased a great steak which I did on our grill.  It was a great meal.

       Cyndy generally does't like Stroganoff but I again made my Hamburger Stroganoff from the blog May 11, 2011.  Cyndy really liked it.   
It took me less than one hour to make it. The recipe is at the end of this blog.

Cyndy and I again went  to our Mormon friends home for what they call Family Night which in my opinion was just another "brainwashing " session.  It was interesting how they were able to relate almost anything to the Book of Mormon or the Bible.  I tried to keep my mouth shut.

Anyway it is time to go workout at our athletic club.

À bientôt, 
Mr Nut

Hamburger Stroganoff    blog 5-11-11
Modified recipe from www.Simplyrecipes.com
Serves four
takes about an hour to prepare

The main advantage of ground beef is clearly budget, and if worked properly you can also have wonderful flavor. First,  take the time to properly brown the meat. In other words, don't stir it! Just let it cook, on relatively high heat, until well browned, before giving it a stir. The browning is what gives you the flavor. Use the cooking of the onions and mushrooms to scrape up any of the browned bits, and sherry to deglaze the pan to get the rest. It's also important to salt while you cook. 
After gathering and processing the ingredients it take about one hour to make the stroganoff.

INGREDIENTS
Regular Smart Balance
1 lb. ground 85% or better fat free
Salt and pepper
1 yellow onion, chopped (about 1 cup)
8 ounces ( 3 1/2 cups) sliced mushrooms
1/3 cup of dry sherry, dry white wine, or water
1/4 cup chopped parsley, loosely packed or 1/8 cup parsley flakes
1 1/2 cups sour cream (room temperature)
1 teaspoon lemon juice
1 tablespoon tarragon
1/4 teaspoon paprika or more to taste
6 ounces egg noodles

METHOD
1 Put a large pot of salted water (2 teaspoons salt and 2 quarts of water) on to heat, for the pasta.
2 Heat a large sauté pan on medium high heat. Melt 1 teaspoon butter in the pan and swirl it around. Working in  two batches as not to crowd the meat (crowding it will make it hard to brown), break up the ground beef and add it to the pan. Sprinkle the meat with salt. Do not stir the meat, as stirring will prevent browning. Once the meat is well browned on one side (two minutes per side, depending on how hot the pan), Use a spatula to flip to the other side. Once that side is browned as well, remove the meat from the pan and set aside. Continue to brown second batch, adding a teaspoon of butter to the pan with each batch if needed, break up the meat into small pieces using the spatula.  Remove meat from pan. Drain excess fat from pan.
3 Lower the heat to medium. Add the onions to the pan. If you are working with very lean meat, you may not have any residual fat in the pan. If this is the case, add in a tablespoon of olive oil to the pan. Cook the onions, scraping up the meat drippings, until soft, about 5 minutes. Remove onions from the pan (add to the meat).
4 Depending on the cooking times of your particular brand of pasta, this is likely a good time to add the pasta to the boiling, salted water.
5 While the pasta is cooking, add a tablespoon of butter to the pan, increase the heat to medium high. Add the sliced mushrooms. Sauté until nicely browned (about 4 minutes). Add the sherry (or dry white wine or water) to the pan to deglaze the pan, scraping up any browned bits. Let the sherry reduce by at least a half, then lower the heat to low.
6 Remove the pan from the heat. Mix in the 1 1/2 cup of sour cream and 1/4 teaspoon paprika until smooth. Return the pan to very low heat, and not let the sour cream boil (or it may curdle).  Stir in the one teaspoon lemon juice, and about 1/4 teaspoon of salt. Stir in the meat and onions. Stir in the 1/8 cup parsley flakes. Add more salt, pepper, to taste.
7 Keep the stroganoff on warm heat until the noodles are done cooking. When the noodles are ready (al dente) drain and mix into the stroganoff.


Thursday, November 1, 2012

Halloween plus Carbon Dioxide Generators

Hello loyal follower(s)


Halloween eve was spent in Mesquite Nevada, where we had a great meal and Cyndy played the slots for a few hours.

I found a comfortable spot to read while Cyndy played the slots.


Cyndy was off to play in a symphony concert for Halloween.  It was a concert designed around  child musicians.   Costumes were required,  thus you see at the right gypsy Cyndy.


Today I must make some pizza dough for tomorrow's pizza night.


Also I want to repeat the directions for  making:


Carbon Dioxide Generator


First from the Oct-Nov issue of Cook's illustrated was  suggestion from Tom Clark from Noblesville Ind.  He suggested creating a carbon dioxide generator to help extend the shelf life of greens such as lettuce. Just exhaling into a bag of lettuce was not sanitary. The people at Cook's Illustrated followed through and developed a neat CO2 generator.


White vinegar and baking soda and of course a small container was all that was necessary to create a CO2 generator for extending refrigerator life of greens.


Three pieces of paper towel and a rubber band to top off the generator, yet allow the gas to escape into the plastic bag containing the greens.

Baking soda acted as the trigger.

CO2 Generator:   First freeze 1 teaspoon of vinegar in the bottom of the 2-3 ounce container.  Then sprinkle 1 teaspoon baking soda over the frozen surface of the vinegar. Lastly seal the top with the three layers of paper towel and a rubber band.  Store in the freezer until you need it.

À bientôt.

Mr Nut

Tuesday, October 30, 2012

Chicken Minestrone

Hello loyal follower(s)

     While Cyndy and I were soaking in  our Hot-Tub last night about 11:30 PM we shared our experience with the Turkey Minestrone that I made yesterday.  It appeared that we both found that the Turkey Minestrone did not "sit well" in our GI  tract.  The soup tasted great but after an hour or two the greasiness became apparent.  As we soaked we discussed the possible causes and how to  rectify them.
      First of all, why would you need to start with 2 tablespoons of oil just to cook bacon??  Answer: you do not need oil to cook bacon.   Eliminate the oil!
      Secondly after cooking the bacon yields a lot of fat, pour off the fat.
      Thirdly Ground Turkey purchased at a store has at least 10 percent fat.  Solution: replace turkey with chicken breasts processed in a food processor.
      Lastly, drain off the liquid and rinse the Navy Beans.   This will reduce the gas producing affect of the beans.
     The result of our soaking and thinking at the same time were three  fold:  First, the Turkey Minestrone would to be removed from Mr Nut's favorite recipes.  Second, the new Chicken Minestrone is to take the place of the now out of favor Turkey Minestrone and lastly we had to get out of the Hot Tub because the water was now too cool.

Tonight  I will make Ham and Pineapple with orange sauce for dinner, because Cyndy is playing in three concerts today, one is Peter and the Wolf.  Dinner will be between concerts.

The recipe can be searched by typing in Ham and Pineapple in the search box at the top of this blog.  I first made this recipe 2-12-12.

Below is the new recipe for Chicken Minestrone.

À bientôt,
Mr Nut


Chicken Minestrone
 Created in a Hot Tub by Mr Nut and his wife, Cyndy


Makes about 6 servings  

                                                     
12 oz ground chicken breasts, use food processor                                            
4 oz bacon, diced.                                               
1/2 cup  onion, chopped.                                          
2 cups celery, finely chopped.                               
3 cups carrots, cut into thin “wheels”.                  
2 cups zucchini, finely chopped.                          
1 tsp rosemary
1 tsp oregano
1 can (14.5 ounces) tomatoes, diced.                  
1 teaspoon minced garlic.                                    
2  1/2 cans ( 5 cups) chicken broth.                    
1 can ( 15 ounces) navy beans; drained and rinsed 
5 oz (2 cups) frozen leaf spinach, chopped.        
1/4 cup dried parsley flakes                       
 1/2 cup pasta shells.                                   
1/2 teaspoon Sea salt
1/4 teaspoon  pepper

Directions:

  1. Fry the 4 oz bacon in a large pot over moderate heat.   Then pour off the fat.
  2. Chop up the chicken breasts in a food processor and Add the 12 ounces ground chicken to the large pot . When meat is browned add 1/2 cup onion, 2 cups celery, 3 cups carrots, 2 cups zucchini, 1 teaspoon rosemary, and 1 teaspoon oregano and saute, stirring frequently, until softened, about 5 minutes. 
  3. Add the 1 can tomatoes, 1/2 tablespoon minced garlic, 2 1/2 cans chicken broth, and 1 can (rinsed) beans, and season lightly with salt and pepper. Bring to boil, add 5 ounce frozen spinach, reduce heat to low, and simmer, partially covered, until fresh veggies are tender, about 20 minutes.
  4. Meanwhile, cook the 1/2 cup pasta shells in boiling, salted water until tender, about 10 minutes. Taste test often, as brands differ. (Cooking pasta separately gives more reliable results.) 
  5. Drain, reserving water. Add pasta and chopped parsley to minestrone. Minestrone is meant to be a thick soup, but if its too thick, add a little of the hot pasta water. Taste, and adjust seasoning as needed.

Monday, October 29, 2012

57% Whole Wheat Sandwich bread

Hello loyal follower(s)

Again, last friday 10/26/12, I tried to make the Whole Wheat and Flax flour bread using the recipe from the 10-23-12 blog.  The flavor  of the bread was better, but it was still to dense for our liking.  therefore even though it is an acceptable recipe,  it will not be included in Mr Nut's favorite recipes.


The texture of the crumb was better than last Tuesday's attempt at this recipe.
Also, it passed the tasters test (neighbors).


But Friday evening, we had a great pizza.


It was a three finger pizza (two plus inches high) with a very thin crust.
You can get to the recipe by typing in Cheese Pizza in the search box at the top of this blog.


Now for the MAIN event of this blog.

Saturday I started making the 57% Whole Wheat Sandwich bread.  It had a starter dough and a Whole Wheat soaker dough.  The soaker dough had milk as an ingredient thus it needed to be refrigerated over night. The enzymes in the milk helped soften the Bran in the WW flour, which reduced the damage done to the formation of gas bubbles in the dough during fermentation.
I got out of bed at 6 AM Sunday to get the soaker dough out of the refrigerator so it would warm up by the time I got out of bed for good (think 9AM).
     I was allowed use of the main kitchen counter to finish working on the bread.

This was a round, but I forgot to take a picture before flattening out the  dough.  This was flattened out to about one inch thick.


The soaker dough was very stiff and was cut up into small pieces so it could better blend with the starter dough in the stand mixer.  This was one of the few times the dough hook was used in all the bread recipes I have made in the past.


During the process of kneading the two dough together other ingredients were added including butter.  What a mess that was.  I do not have pictures because my hands were  so greasy from kneading  by hand, the butter into the combined doughs to take a picture.


Anyway, here the rounds were starting a fermentation for 45 minutes.


At this point the battle for the use of the kitchen began.


I was allowed only the use of two feet of counter space along with the stove top.   I was about to start making Turkey Minestrone while my bread was baking.  This recipe is in Mr Nut's favorite recipes booklet.

Again you can get to the recipe by typing in Turkey Minestrone  in the search box at the top of this blog.


Meanwhile the  main boss of this castle got the good counter space.


Cyndy was in control, as she worked on a quilt she as making.

The concept of two kitchen that I mentioned before sure sounds like a good idea except for the cost.


Back to the bread.


The bread was  done and just cooling in the pans for five minutes, at which time they were lifted out of the pans via the parchment paper slings.

Say "goodbye" to greasing pans, parchment paper is here to stay.


This was a fantastic bread and it has been included in the Mr Nut's favorite recipe folder.


Recipe follows:

À bientôt,

Mr Nut


57% Whole Wheat Sandwich Bread 
From blog April 25, 2011 revised November 15, 2011
Inspired by Cook’s Illustrated recipe in March 2011 issue 
Modified for 7 qt Cuisinart stand mixer.with speeds from 1 to 12
MAKES TWO 9 x 5-INCH LOAVES

     This recipe provided freedom of choice with timing and techniques.  It was possible to start this bread anytime of the day and modify the refrigerator time or the fermentation time to meet your schedule.   
      Whole Wheat floor contains; the germ the Bran and the endosperm. The endosperm contains the two proteins needed for making gluten. The key to making this bread was the softening of the Bran fiber in the whole wheat flour by mixing the flour with milk and delaying fermentation overnight or up to twenty-four hours by refrigeration.  This lessened the deflation of the dough by the punctures caused by sharp edges of the  Bran.
The following (optional) natural healthful ingredients were added to improve bread volume or taste. 
Salt: Sea Salt, which contains additional minerals for better gluten development.
Dough Enhancer: See blog for April 5, 2011 for ingredients.
 Delayed fermentation is a relatively new technique in the United States.  By using cold milk in the mixing of the Whole Wheat Soaker  and delaying fermentation by refrigeration, the yeast remains inactive while enzymes in the in the flour go to work improving flavor, strengthening (softening the fibrous Bran), etc..
 Long fermentation at room temperature was only used to create a Starter dough.   In this recipe, kneading using  the dough hook was used to avoid a second long fermentation  after the Starter and Soaker are combined.


INGREDIENTS
Starter dough:
3 cups (15 ounces 420 g) bread flour.                        
1 cup (8 ounces) warm water ( 110-115℉)
1/2 teaspoon Instant yeast.

Whole Wheat Soaker dough:
4 cups (20 ounces 560 g) whole wheat flour.             
1/2 cup (2.5 ounces, 70 g) wheat germ.                     
2 cups (16 ounces) whole milk.                                      

Dough
2 tablespoons Canola oil.                                     
1/4 cup honey.                                                       
1 tablespoon Sea salt.                                       
2 tablespoons instant yeast .                             
6 tablespoons Smart Balance (very soft).        
1/4 cup dough enhancer.                               

Directions:

  1. Starter: In the stand mixer bowl, using the Paddle Blade (speed 2), combine the blue ingredients until uniform slightly damp dough forms. Spray the top of the dough with Canola oil and transfer it to a large oiled bowl, cover it and let stand at room temperature (70-75℉) overnight or up to 24 hours. 
  2. Whole Wheat Soaker: In the stand mixer bowl, using the Paddle Blade (speed 2), combine the Green ingredients, until uniform damp dough forms. Turn out dough onto lightly floured work surface and knead by hand (groan) until smooth, 2 to 3 minutes. Place the dough back in the bowl and spray the top of the dough with Canola oil. Tightly cover bowl delay the fermentation by refrigeration overnight  or  up to 24 hours.
  3. Combine 1 and 2 for the Dough: Allow the Whole Wheat soaker to warm up close to room temperature.  Then break up the Whole Wheat Soaker into small pieces about 1/8 (use pizza cutter) cup size and put in the bowl for the heavy duty stand mixer.  Deflate and add the starter and the Red ingredients.  Using the Dough Hook at speed 2, mix  until dough is smooth and elastic, 4 to 6 minutes. 
  4. Turn out dough onto lightly floured counter and divide the dough into two loaves. Knead about  2 minutes. Shape dough into  rounds and place on 15 inch squares of parchment paper. Cover tightly with inverted bowls and allow to rise at room temperature 45 minutes.
  5. Prepare Oven:  Adjust oven racks to middle and lowest positions, place baking stone on bottom  rack, and heat oven to 400 degrees.
  6. Form Loaves:  Transfer dough rounds to well-floured counter. Working with one round at a time, create an 8 by 17-inch rectangle. With the short side facing you, roll dough toward you into firm cylinder.  Turn loaf seam side up and pinch it closed. Place the loaves on the parchment paper seam side down.  Then use the parchment paper as a sling, lower the parchment paper an the loaves into the pans. Press gently into corners. Repeat with second round of dough. Cover loaves loosely with plastic wrap and allow to rise at room temperature until almost doubled in size, 60 to 90 minutes (top of loaves should rise about 1 inch over lip of pan).
  7. Baking:  Place a broiler pan on bottom oven rack and pour two cups boiling water into the broiler pan. Using wet single-edge razor blade, make one ¼-inch-deep slash lengthwise down center of each loaf.  Set the loaves on the middle rack. Reduce oven temperature to 350 degrees. Bake until crust is dark brown and internal temperature registers about 200 degrees on instant-read thermometer. (40 to 50 minutes), rotating loaves 180 degrees and side to side halfway through baking.
  8. Cooling: Transfer pans to wire rack and let cool 5 minutes. Then remove loaves from pans, return them to rack, and cool to room temperature, about two hours.


Thursday, October 25, 2012

Flax and Cornmeal pancakes & Food Processor Problems

Hello loyal follower(s)

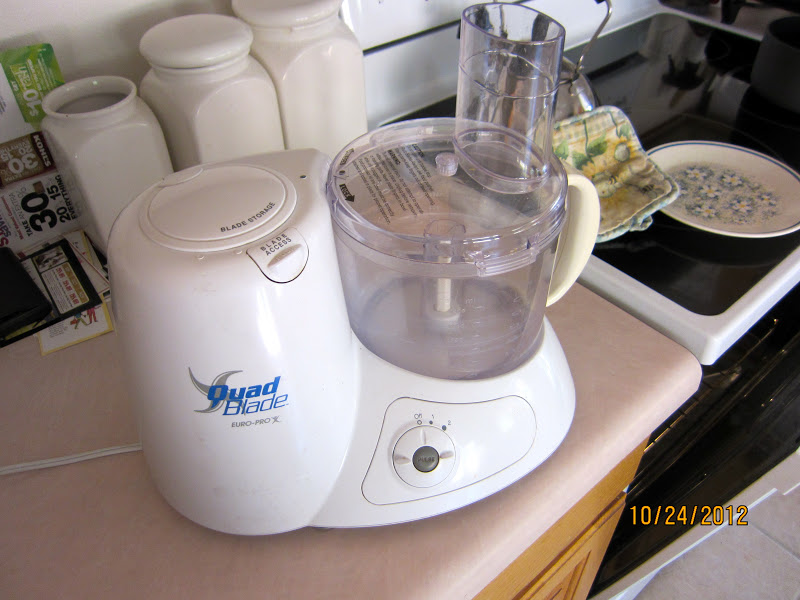
On October 17 I wrote about needing to order replacement parts for our food processor.  The part that was broken was ordered plus two extra ones for future breakage.  TWO days later while grinding round steak into hamburger, the processor died.  Three days later it arose again from the dead while  an autopsy was being preformed.  When the processor was open up I expected to find gears in a transmission but found a simple belt off its track instead.  Regardez-vous!


I took the processor out on our "lawn" to get better light for this picture.  After fixing the belt and checking the other vital parts I declared the processor risen from the dead.


The food processor has return to it's rightful position at the left side of the stove, to serve Mr Nut and Cyndy forever more, or at least until the belt breaks.

I could not find a new food processor that had four blades for chopping, some we hope our processor has a long reign.


Now back to the flax flour and what to do with it.  The following recipe came right off of the package.

Flax Pancakes
Flax USA
serves 2


INGREDIENTS:
  • 1/4 Cup - Flax Usa Organic Milled Flaxseed
  • 2 Tsp - Baking Powder
  • 1 Cup - Whole Wheat Flour
  • 1/2 Tsp - Baking Soda
  • 1 Tbsp - White Sugar
  • 1 Cup - Low-Fat Buttermilk
  • 1 Egg
  • 1/2 Tsp - Salt
  • 1 Tbsp - Canola Oil

DIRECTIONS
  1. Combine flour, flax, baking soda, baking powder, salt and sugar in a large bowl.
  2. In a separate bowl, mix egg, milk and oil with whisk.
  3. Add liquid ingredients to dry ones. Gently stir until moistened, but do not over mix. Batter should be lumpy.
  4. Spray griddle or pan with nonstick spray. Cook pancakes on hot griddle
  5. Serve with toppings like sliced strawberries, hot cinnamon applesauce or peaches.
Of course I could not just let this recipe stand as it is.  Cyndy doesn't like pancakes, therefore I needed  a recipe for one person.  I added some cornmeal for crunch and eggbeaters for the egg.  I froze the eggbeaters in a ice cube tray, one cube equals one half of an egg (1/8 cup).  These recipes will be included in Mr Nut's favorite recipes.

Flax and Cornmeal Pancakes
based on recipe from Flax USA package
serves Mr Nut

INGREDIENTS:
  • 1/8 Cup  Flax Usa Organic Milled Flaxseed
  • 1 teaspoon  Baking Powder
  • 1/2 Cup  Whole Wheat Flour
  • 1/4 teaspoon  Baking Soda
  • 1 1/2 teaspoons  White Sugar
  • 1/8 cup cornmeal
  • 1/2 Cup Low-Fat Buttermilk
  • 1/8 cup  Eggbeaters
  • 1/4 teaspoon  Salt
  • 1 1/2 teaspoons Canola Oil

DIRECTIONS
  1. Combine 1/2 cup flour, 1/8 flax, 1 teaspoon baking soda, 1/8 teaspoon baking powder, 1/4 teaspoon salt and 1 1/2 teaspoons sugar in a large bowl.
  2. In a separate bowl, mix 1/8 cup eggbeaters, 1/2 cup milk and 1 1/2 teaspoons oil with whisk.
  3. Add liquid ingredients to dry ones. Gently stir until moistened, but do not over mix. Batter should be lumpy.
  4. Spray griddle or pan with nonstick spray. Cook pancakes on hot griddle
  5. Serve with toppings like sliced strawberries, hot cinnamon applesauce or peaches.

That's all for today,

À bientôt, Mr Nut

Tuesday, October 23, 2012

Whole Wheat & Flax Flour bread

Hello loyal follower(s),

I have not just been sitting around during the last week.  Two weeks ago I was given 48 ounces of Flax flour, because our friends did not know what to do with it.  At that time that made two of us that did not know.  Cyndy always puts Flax Meal on our breakfast cereal for the Omega-3 that is in the Flax.

Before I get into the bread making, I want to share a  photo of our Friday night pizza.  We could not eat it all and will have the remaining pizza as a leftover tonight for dinner.


This pizza was about 1 1/2 inches thick (three fingers) and here it was ready for the oven.

Now back to the project of bread with Flax.


Most of my existing recipes for bread will have to be reworked because of all the stuff I learned during the last year and one-half.   Today I reworked and modified one of the Whole Wheat recipes.  The results were good but is was a heavy bread.  It was similar in texture to the 100% whole wheat bread that I remember from my childhood. I did not eat it back then, only my parents ate it.  The slices needed to be thin back then, and now because it was very filling.  My testers (neighbors) gave it a seven out of ten.  They and I tend to favor the lighter breads.


One thing I learned was that it was better to divide the dough immediately after the mixing the ingredients.   Here the two loaves were starting their first fermentation.


The loaves were now ready to be placed in the
dutch ovens.


The final results with a slightly darker crust than I had planned on because I was too slow covering the loaves with aluminum foil during the baking process.


The crumb looked good and was very fine grained.

In the recipe that follows I reduced the Whole Wheat flour from 1 1/2 cups to 1/2 cup and increased the bread flour by one cup.  This should yield a lighter loaf that will better satisfy my testers.

Recipe follows:


À bientôt.
Mr Nut


Whole Wheat and Flax flour Bread; Artesian Style
October 20, 2012
European style: (Crisp-crust; large air spaces
Inspired by Jim Lahey’s book; My Bread 
Using a Cuisinart stand mixer, with speeds from 1 to 12
Yield two seven inch round loaves

     This recipe provides the ultimate freedom of choice with timing and techniques. It is possible to start this bread anytime of the day and modify the fermentation time to meet your schedule.
   Whole Wheat and Flax flour doesn’t contain the proteins needed for making gluten. Vital Wheat Gluten was added to help compensate for the lack of gluten producing proteins.
    The following (optional) natural healthful ingredients are added to improve bread volume or taste.
           Salt: Sea Salt, which contains additional minerals for better gluten development.
           Dough Enhancer: See April 5, 2011 blog for ingredients and an explanation of    
           their function. 
     Long fermentation at room temperature eliminates kneading and allows for the yeast to work its magic.

Ingredients:
 5 1/2 cups (28 oz; 780 g) bread flour. 
1 cup ( 110  g) Flax flour 
1/2 cups Whole Wheat flour (70 g)                             
1 teaspoon instant dry yeast.
1/2 cup ( 2.5 oz 70g) Vital Wheat Gluten.                       
1/4 cup Dough Enhancer. 
2 teaspoons Sea salt 
1 tablespoon chopped fresh Rosemary
1/2 cup honey
 About 2 1/4  cups  water.

1. Dry Mix:
In the mixer bowl using the Chef Whisk on speed 1, mix the Blue ingredients, minimize the mixing time. 
2.  Wet Mix:  Spray oil in a 1/4 cup measuring cup, then fill it with honey. Mix the honey with the 2 1/4 cup warm water (90-95℉). 
3. Switch to the Paddle Blade at speed 2, and slowly add the wet mixture to the dry mixture to yield a workable dough.
4.  Divide the dough into two loaves and allow the loaves to rest for about five to ten minutes, then move the dough to two  oiled bowls. ( so the stand mixer bowl can be cleaned). Spray the top of the dough with oil, and cover the bowls. 
5.  First fermentation;  Set the dough out at room temperature 72-75℉ (use a heating pad if room is cool) for 12 to 18 hours. If convenient, vigorously stir the dough about halfway through the rise. 
6.  Second Fermentation: Move the loaves onto on 15-inch squares of baking parchment paper dusted with flour.  Dust the loaves with flour.  Cover each loaf with a large pan and let them ferment for 1 1/2 to 2 hours.
7.   Prepare Oven: 20 minutes before baking time, put a rack in the middle of the oven with the Dutch ovens; preheat to 450°F. If you have a baking stone place it near the bottom of the oven it will act as a heat sink. 
8.  Final Dough preparation: Sprinkle or spray the dough top generously with water.  Using the parchment paper as a sling, carefully lift the dough into the pots; take care not to touch the hot pot. Immediately top the pots with their  lids.
9.   Baking: Reduce the heat to 425°F. Bake for 30 minutes. Remove the lid. Using the parchment paper, lift the loaves from the pots and remove the parchment paper from the loaves. and place the loaves on a piece of aluminum foil on the oven rack in the middle position.  (If the top is well browned, cover it with foil.) Bake for about 35 minutes longer until the center registers 203° to 205°F on an instant-read thermometer). Then bake for 5 minutes longer to ensure the center is baked through. Note: the appearance of the loaf is more important in determining the doneness of the loaf than the internal temperature (from Cook's illustrated magazine, May-June 2011 page 31).  Cool  thoroughly on a wire rack.


Wednesday, October 17, 2012

Reuben Casserole & Tuna Salad Sandwich

Hello Loyal follower(s),

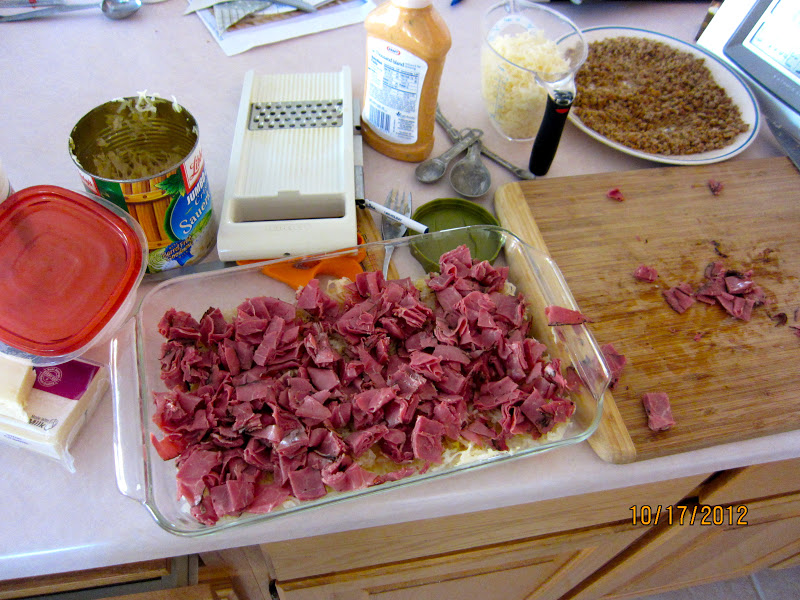
      This morning was Reuben Casserole day.  Of course, I had to make some changes.   For starters, I used pastrami instead of corn beef.  Also A smaller baking dish which required less bread crumbs.  I aimed as a dish size about 80 square inches.


Here a 11x7 baking dish was used.  The sauerkraut was on the bottom covered by the pastrami.


The shredded cheese and dressing were added here.  And speaking of shredded cheese, i want to be the first to suggest that shredding cheese by a food processor was a mistake.


I broke this part of the food processor for the THIRD time.  You'd think I would learn.  It seems that trying to shred a stiff piece of cheese created too much torque causes the thin plastic shaft to crack.

The casserole was refrigerated for the evening meal. Crumbs were added at the time of baking.


The finished product was good bust not good enough to become one of Mr Nut's favorite recipes.


The process took so little time that I had time to make The Best Tuna Salad Sandwiches for lunches.

This is one of Mr Nut's favorite recipes.


here was everything needed.


Here was one good place for the thin buns. Twenty minutes in a countertop oven and we had nice warm sandwiches.

Cyndy went to band practice and I went to the athletic club for a  workout knowing that meals for the day were under control.

Recipes follow:

À bientôt. Mr Nut


Reuben Casserole
Original recipe was from the Penzey’s (Spices) catalog 
sent to me by Ruth Sarrica
Modified to suit Mr Nut’s whims
Serves Four

Ingredients
16 oz. sauerkraut, rinsed and drained well
1/2  tsp. WHOLE CARAWAY SEED
12 oz. pastrami, shredded or cubed   
2 Cups shredded Swiss cheese 
1/2 Cup light mayonnaise
1/2 Cup Thousand Island dressing
1 cup Rye bread crumbs made from Artesian Style homemade rye bread
3 tablespoons butter, melted
Instructions:
  1. Preheat oven to 350°. 
  2. Make the bread crumbs any method you prefer.  
  3. Spread the 16 ounces of rinsed and drained sauerkraut in the bottom of a 7x11 or 9x9 glass baking dish. Aim for about 80 square inches of area in the base of the baking dish
  4. Sprinkle with the 1/2 teaspoon CARAWAY SEED. 
  5. Top with the 12 ounces pastrami. 
  6. Sprinkle with the 2 cups shredded swiss cheese. 
  7. In a small bowl, mix together the 1/2 cup mayonnaise and 1/2 cup dressing. 
  8. Spread the mixture over the cheese.
  9. Mix the 3 tablespoons of butter into the bread crumbs and sprinkle over the top of the casserole.
  10. Bake at 350° for 40-45 minutes or until bubbling.


THE BEST TUNA SALAD (warm sandwiches)
5-30-2011 revised Jan 5, 2012
From Cook’s Country promotional magazine 2011 and Cyndy’s recipe
A Mr Nut favorite recipe

Makes enough for three thin bun  sandwiches

For complete recipe:  Carbohydrates  86.8 g;   Calories  1431


Our favorite canned tuna is White Albacore Tuna in Water; avoid chunk light tuna.

1   (7-ounce) can solid white albacore.(water packed). Carbohydrates 0 g; Calories 245
 1/2 cup ( 60 g) chopped celery fine.                              Carbohydrates 1.8 g; Calories 9
1/8 cup minced red onion.                                              Carbohydrates 2 g; Calories 8
1 tablespoon olive oil.                                                     Carbohydrates 0 g; Calories 120 
1  teaspoon lemon juice.                                                Carbohydrates 0 g; Calories 245 
1/4 teaspoon Sea salt 
1/4 teaspoon pepper
1/2 cup grated Cheddar cheese.                                    Carbohydrates 2 g; Calories 220
1/8 cup  sour cream.                                                       Carbohydrates 2 g; Calories 40 
1/8  cup plus Miracle Whip.                                             Carbohydrates 5 g; Calories 74
 3 Multigrain sandwich thins.                                        Carbohydrates 66 g; Calories 270
1/4 cup ( 1 ounce; 33 g) sunflower seeds.                     Carbohydrates 8 g; Calories 200

  1. MARINATE TUNA Place tuna in fine-mesh strainer and press dry with paper towels. Transfer to medium bowl and mash with fork until finely flaked. 
  1. Microwave 1/8 cup onion and 1 tablespoon oil in small bowl until onion begins to soften, about 2 minutes. Cool slightly, about 5 minutes. 
  2. Combine onion mixture, lemon juice, 1/4 teaspoon salt, 1/4 teaspoon pepper,   then combine with the tuna and let sit 10 minutes.
  3. FINISH SALAD Stir 1/4 cup Cheddar cheese, 1/4 sunflower seeds, 1/8 cup Miracle Whip 1/8 cup Sour cream and celery into tuna mixture. Season with salt and pepper. 
  4. Make and wrap sandwiches in aluminum foil,  heat (350℉) sandwiches in a countertop oven for about 20 minutes.
TUNA SALAD WITH SWEET PICKLE AND EGG
Prepare The Best Tuna Salad, adding 1/8 cup sweet pickle relish to tuna with cooked onion mixture in step 2. Stir one chopped hard-cooked eggs into salad in step 4.